
-
Filter By Stock
- In Stock (9)
Filter By Brand
- iduino (12)
Arduino Motor Controller Modules
Popular Products

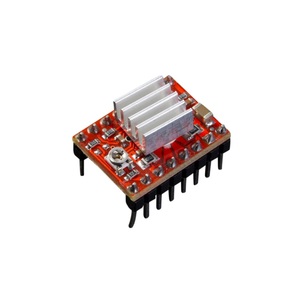


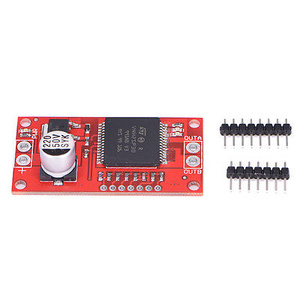


Arduino Motor Controller Modules
Explore our range of Arduino motor controller modules and motor driver boards at Aus Electronics Direct. Designed for robotics, automation and DIY electronics projects, these modules allow Arduino-compatible microcontrollers to control the speed, direction and movement of different types of motors.
Our range includes DC motor drivers, dual H-bridge motor controllers, stepper motor driver modules, servo motor controllers and Arduino motor shields. Whether you are building a robot car, controlling a stepper motor or developing an automated mechanism, choosing the right motor controller helps provide reliable and precise motor operation.
Browse popular motor driver options, including L298N dual H-bridge modules, L293D motor controller shields, A4988 stepper motor drivers and other Arduino-compatible motor control boards. Compare motor voltage, current capacity, supported motor types and control features to find a suitable solution for your project.
Type of Motor Controllers
DC motor driver and H-bridge modules
Used to control DC motor direction and, where supported, speed using PWM signals. Target keywords such as Arduino DC motor driver and L298N motor controller.
Stepper motor driver modules
Used to control stepper motor movement and positioning. Target Arduino stepper motor driver and A4988 driver board.
Servo motor controllers
Used to control servo position through suitable control signals. Target Arduino servo controller and multi-servo motor driver.
Arduino motor shields
Plug-in boards that provide motor-driving circuitry and convenient connections for compatible Arduino boards. Target Arduino motor shield and Arduino motor controller shield.
How to Choose the Right Arduino Motor Controller
Choosing the right Arduino motor controller is important for achieving reliable motor performance in robotics, automation and DIY electronics projects. Different motors require different driver circuits, voltage levels and current capacities. Before purchasing a motor controller module, consider the following factors to ensure it is compatible with your motor and Arduino board.
1. Motor Type
Start by identifying the type of motor you want to control, as different motors require different driver modules.
-
Brushed DC motors: Use a DC motor driver or H-bridge module to control motor speed and direction. These are commonly used in robot cars, small vehicles and automated mechanisms.
-
Stepper motors: Require a dedicated stepper motor driver to control rotation, speed and positioning. Popular options include A4988 and DRV8825 driver modules.
-
Servo motors: Use suitable servo control signals to adjust the motor's position. Some Arduino projects can connect servos directly to control pins, while larger multi-servo projects may benefit from a dedicated servo controller.
Selecting a controller designed for your motor type helps ensure correct operation and control.
2. Operating Voltage
Check the operating voltage requirements of both your motor and the motor controller. The controller's supported voltage range must accommodate the motor's supply voltage.
For example, a small DC motor may operate at 6V or 12V, while larger motors may require higher voltages. Using a voltage outside the driver's specified range can cause unreliable operation or damage the module.
Also check the controller's logic voltage requirements to ensure its control inputs are compatible with your Arduino board.
3. Continuous and Peak Current
Current capacity is one of the most important specifications when selecting an Arduino motor controller. Check both the continuous current rating and peak current rating.
-
Continuous current: The amount of current the driver can safely handle during normal operation.
-
Peak current: The maximum current the driver can handle for a limited period under specified conditions.
Motors can draw significantly more current when starting, accelerating or becoming stalled. Choose a controller that can handle the motor's expected operating and startup current without overheating or triggering protection circuits.
For multi-motor projects, check whether the current rating applies to each motor channel or to the entire controller board.
4. Number of Motors
Consider how many motors your project needs to operate independently.
-
Single-channel controllers: Suitable for controlling one motor.
-
Dual-channel controllers: Allow independent control of two DC motors and are popular in robot car projects.
-
Multi-channel controllers: Useful for robotics and automation projects involving several motors.
-
Multi-servo controllers: Designed to control multiple servo motors through dedicated signal outputs.
Choose a controller with enough independent channels for your project, allowing room for additional motors if you plan to expand the system later.
5. Speed and Direction Control
Consider whether your project requires basic on/off operation, variable speed control or bidirectional movement.
Many DC motor driver modules support Pulse Width Modulation (PWM), allowing an Arduino to adjust motor speed by changing the duty cycle of the control signal. H-bridge drivers also allow the motor's direction to be reversed by changing the input signals.
Stepper motor drivers provide more precise control over motor steps and rotation, while servo controllers use position commands to adjust servo movement.
Choose a controller that supports the level of speed, direction and positioning control your application requires.
6. Arduino Compatibility
Not every motor controller is compatible with every Arduino board. Before purchasing, check the module's electrical and communication requirements.
Important compatibility considerations include:
-
Logic voltage: Confirm whether the controller accepts 5V or 3.3V logic signals.
-
Input connections: Check the required digital, PWM or other control pins.
-
Control interface: Determine whether the module uses standard digital signals, PWM, STEP/DIR signals, I2C or another interface.
-
Board compatibility: Check whether the controller is suitable for your Arduino model, such as the Arduino Uno, Mega or Nano.
-
Libraries and programming: Confirm that suitable Arduino libraries, example sketches or documentation are available where needed.
Checking compatibility before purchasing helps avoid wiring difficulties and unnecessary additional components.
7. Power Supply
Motor controllers often require a separate power supply to operate the connected motors. Arduino boards are designed for microcontroller operation and generally cannot supply the current required by motors directly.
When selecting a power supply, consider:
-
The motor's rated operating voltage.
-
The motor's normal and startup current requirements.
-
The combined current requirements when operating multiple motors.
-
The motor controller's permitted input voltage and current.
-
Whether the controller requires a separate logic supply.
For many projects, the Arduino and motor driver share a common ground reference, while the motor receives power from a separate supply. Follow the controller manufacturer's wiring instructions, particularly if the board provides electrical isolation.
8. Cooling and Protection
Motor drivers can generate heat during operation, particularly when controlling high-current motors or operating several motors simultaneously.
Look for features that help protect the controller and connected components, including:
-
Thermal protection: Helps prevent damage if the driver becomes too hot.
-
Overcurrent protection: Helps protect against excessive current draw.
-
Overvoltage protection: Helps protect against supply voltage exceeding specified limits.
-
Short-circuit protection: Helps reduce the risk of damage caused by wiring faults.
-
Heat sinks: Help dissipate heat during demanding applications.
Check the manufacturer's specifications rather than assuming every motor controller includes these protection features. Adequate ventilation and correct current ratings are also important for reliable operation.
Final Considerations
The best Arduino motor controller depends on your motor type, voltage, current requirements and desired level of control. A dual H-bridge module may be suitable for a small robot car, while a dedicated stepper driver is better for precise positioning applications. Projects involving multiple servo motors may benefit from a dedicated servo controller.
At Aus Electronics Direct, explore our range of Arduino motor controller modules, DC motor drivers, stepper motor drivers and motor shields to find a suitable solution for your next robotics, automation or electronics project.
Arduino Motor Controllers – Frequently Asked Questions
1. What is an Arduino motor controller?
An Arduino motor controller is an electronic module or circuit that allows an Arduino board to control the operation of electric motors. It acts as an interface between the low-power Arduino microcontroller and the motor's power supply. Depending on the controller type, it can regulate motor speed, direction, rotation and positioning.
2. What is an Arduino motor driver used for?
An Arduino motor driver is used to control motors in robotics, automation and DIY electronics projects. It allows an Arduino to operate DC motors, stepper motors and, with suitable control circuitry, servo motors. Common applications include robot cars, robotic arms, conveyor systems, automated doors and small machinery.
3. How does an Arduino motor controller work?
An Arduino motor controller receives digital or PWM signals from the Arduino and uses internal electronic components to control the power delivered to a motor. For example, an H-bridge motor driver can change the polarity of the voltage supplied to a DC motor, allowing it to rotate forwards or backwards. PWM signals can also be used to adjust motor speed by controlling the power delivered over time.
4. What is the difference between a motor driver and a motor controller?
A motor driver is the power interface that supplies the electrical current needed to operate a motor based on control signals. A motor controller manages how the motor operates, including speed, direction and positioning. In Arduino projects, these terms are often used interchangeably because many modules combine motor-driving circuitry with basic control functions.
5. What is an H-bridge motor driver?
An H-bridge motor driver is an electronic circuit that allows a DC motor to rotate in either direction by reversing the polarity of the voltage supplied to it. It uses switching components arranged in an H-shaped configuration. H-bridge drivers are commonly used in Arduino robotics projects because they support forward and reverse motor operation, with many models also supporting PWM speed control.
6. What is the difference between L298N and L293D motor drivers?
The L298N and L293D are popular dual H-bridge motor driver ICs used in Arduino projects. Both can control the direction of two brushed DC motors or operate a compatible bipolar stepper motor.
The main differences include:
-
L298N: A higher-current driver, commonly used in motor driver modules with heat sinks. Its typical design supports up to 2A per bridge under specified operating conditions, although practical current capacity depends on cooling and thermal limits.
-
L293D: A lower-current driver with built-in clamp diodes for inductive load protection. It is commonly used in smaller motor projects and Arduino motor shields, with a typical output rating of 600mA per channel.
Both drivers have voltage drops and thermal limitations, so check the manufacturer's datasheet and the complete module specifications before selecting one.
7. How do I connect a DC motor driver to an Arduino?
A typical DC motor driver connects to an Arduino through power, ground and control signal connections. The motor connects to the driver's output terminals, while the Arduino sends signals through the driver's input pins.
A basic connection usually involves:
-
Connect the motor to the motor driver's output terminals.
-
Connect the motor power supply to the driver's motor power input.
-
Connect the driver's ground to the Arduino ground where a common ground is required.
-
Connect the driver's input pins to compatible Arduino digital output pins.
-
Connect PWM-capable pins if speed control is required.
-
Upload an Arduino sketch to control the motor.
Always follow the specific module's wiring diagram and voltage requirements. Do not power motors directly from Arduino I/O pins.
8. Can an Arduino control a DC motor directly?
An Arduino can generate control signals for a DC motor, but its digital output pins cannot safely supply the current normally required to drive a motor. Connecting a motor directly to an Arduino output can damage the board due to excessive current draw and electrical noise or voltage spikes.
A suitable motor driver or transistor-based driver circuit should be used between the Arduino and the motor. This allows the motor to receive power from an appropriately rated supply while the Arduino controls its operation.
9. How do I control DC motor speed with Arduino?
DC motor speed can be controlled using Pulse Width Modulation (PWM). The Arduino sends a PWM signal to a compatible motor driver, which adjusts the average power delivered to the motor.
For example, the Arduino analogWrite() function can generate PWM signals on supported pins:
const int motorPin = 9;

void setup() {
  pinMode(motorPin, OUTPUT);
}

void loop() {
  analogWrite(motorPin, 128); // Approximately 50% duty cycle
  delay(2000);

  analogWrite(motorPin, 255); // Full duty cycle
  delay(2000);
}
The motor driver must support PWM speed control, and the motor must be connected to its output terminals. Actual motor speed also depends on load, supply voltage and motor characteristics.
10. How do I reverse a DC motor using an Arduino?
A DC motor's direction can be reversed using an H-bridge motor driver. The Arduino changes the driver's input signals, causing the driver to reverse the polarity of the voltage supplied to the motor.
For example, one input combination can make the motor rotate forwards, while the opposite combination makes it rotate backwards. Always check the motor driver's truth table and avoid changing direction in a way that exceeds its electrical limits.
11. What is the difference between a DC motor driver and a stepper motor driver?
A DC motor driver is designed to control brushed DC motor operation, typically providing speed and direction control. A stepper motor driver is designed to control the individual steps of a stepper motor, allowing more precise positioning and rotation.
DC motor drivers commonly use H-bridge circuits, while stepper drivers control the motor's winding currents in a specific sequence. Popular stepper driver modules include the A4988 and DRV8825.
12. Can an Arduino motor controller drive two motors?
Yes. Many Arduino motor controller modules feature two independent motor channels, allowing them to control two DC motors separately. Dual H-bridge modules such as the L298N and L293D are commonly used in robot cars and other two-motor applications.
Check the controller's current rating, voltage range and cooling requirements to ensure it can handle both motors operating at the same time.
13. What is an A4988 stepper motor driver used for?
The A4988 is a stepper motor driver module designed to control compatible bipolar stepper motors. It accepts STEP and DIR signals from an Arduino or another microcontroller to control motor movement and direction. It also supports microstepping, allowing smoother movement and finer positioning than full-step operation.
A4988 modules are commonly used in 3D printers, CNC machines, robotics and automated positioning systems. Correct current-limit adjustment and adequate cooling are important when using this driver.
14. What is an Arduino motor shield?
An Arduino motor shield is an expansion board that connects to a compatible Arduino board to provide motor control capabilities. It typically includes motor driver circuitry, power connections and terminals for connecting motors. Depending on the design, a motor shield can control DC motors, stepper motors or other motor types without requiring a separate motor driver module.
15. Can an Arduino control multiple servo motors?
Yes. An Arduino can control multiple servo motors using suitable signal connections and a compatible power supply. The practical number depends on the Arduino board, available pins, timing requirements and the servos' current consumption.
For projects involving many servos, a dedicated controller such as a PCA9685-based servo driver can provide multiple PWM output channels. Use an appropriately rated external supply for the servos rather than relying on the Arduino's onboard power supply.
16. Do Arduino motor controllers require an external power supply?
Most motor controller projects require a separate power supply for the motors because motors often draw more current than an Arduino board can provide. Some small modules may accept power from a shared supply arrangement, but the supply must still meet the motor and controller requirements.
The Arduino typically provides the control signals, while an external supply provides the motor power. Check whether the module requires separate logic and motor supplies, and follow its grounding and wiring instructions.
17. How do I choose the correct motor driver voltage and current rating?
Choose a motor driver with voltage and current ratings suitable for the motor's electrical requirements.
Consider the following:
-
Operating voltage: The driver's supported motor voltage range must include the motor's rated supply voltage.
-
Continuous current: The driver must handle the motor's normal operating current.
-
Peak current: The driver must tolerate the motor's startup and short-duration peak current.
-
Stall current: Consider the motor's stall current, as it can be much higher than its normal running current.
-
Cooling: Check whether the driver requires a heat sink, airflow or other cooling measures.
-
Multiple motors: Ensure the total current demand is within the controller's overall power and thermal limits.
Always compare the motor and driver datasheets rather than selecting a controller based only on its advertised peak current rating.
18. What is the difference between PWM and normal digital motor control?
Normal digital control uses HIGH and LOW signals to switch a motor driver input between two logic states. This is commonly used for basic on/off operation or selecting motor direction.
PWM repeatedly switches a signal between HIGH and LOW at a controlled frequency, adjusting the proportion of time the signal remains HIGH. This is called the duty cycle and allows the motor driver to regulate motor speed. PWM is commonly used in Arduino robotics and automation projects where variable motor speed is required.
19. Can an Arduino motor driver be used for a robot car?
Yes. Arduino motor driver modules are widely used in robot cars to control the movement of DC geared motors. A dual-channel H-bridge driver can independently control the left and right motors, allowing the vehicle to move forwards, backwards and turn.
The Arduino can receive commands from sensors, Bluetooth or Wi-Fi modules and send corresponding signals to the motor driver. Ensure the driver can handle the motors' voltage and current requirements, particularly during startup and when the wheels are stalled.
20. What should I consider when choosing an Arduino motor controller?
When choosing an Arduino motor controller, consider the motor type, operating voltage, current requirements and control features needed for your project.
Important factors include:
-
Motor compatibility: Select a controller designed for DC, stepper or servo motors.
-
Voltage rating: Match the controller's operating voltage range to the motor's power requirements.
-
Current capacity: Check continuous, peak and stall current requirements.
-
Motor channels: Choose enough independent channels for the number of motors.
-
Control features: Consider PWM speed control, direction control and stepper motor positioning.
-
Arduino compatibility: Confirm logic voltage, pin connections and communication requirements.
-
Power supply: Determine whether an external motor power supply is required.
-
Protection and cooling: Look for thermal protection, overcurrent protection and suitable heat dissipation.
Selecting a motor controller with the correct specifications helps ensure reliable operation and protects your Arduino board, motor driver and connected motors.
