-
Filter By Stock
- In Stock (1)
Filter By Brand
- iduino (1)
Arduino Pro Mini Development Boards
Popular Products
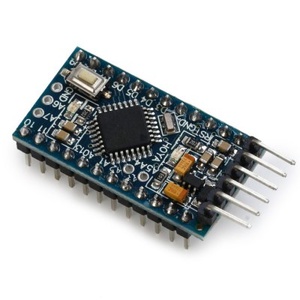
Pro Mini Development Board
What Is an Arduino Pro Mini Development Board?
An Arduino Pro Mini development board is a compact microcontroller platform designed for electronics prototyping, embedded systems and DIY projects. Based on the ATmega328P microcontroller, the Pro Mini offers programmable digital and analogue input/output connections in a small, low-profile circuit board.
Unlike larger Arduino development boards, the Pro Mini does not have an onboard USB interface. Instead, it uses an external USB-to-serial adapter for programming and communication with a computer. This simplified design makes it suitable for projects where size, weight and power consumption are important considerations.
Arduino Pro Mini boards are commonly used in robotics, wearable electronics, wireless sensor systems, home automation and custom electronic devices. Their compatibility with the Arduino IDE and extensive range of libraries makes them a practical option for hobbyists, students and electronics developers.
Features of Arduino Pro Mini Development Boards
Arduino Pro Mini development boards offer several features for compact electronics applications:
-
ATmega328P Microcontroller: Provides the processing capabilities required for embedded electronics and programmable projects.
-
Compact Design: Features a small PCB footprint suitable for space-constrained installations.
-
Digital Input/Output Pins: Provides 14 digital I/O pins for connecting and controlling electronic components.
-
PWM Outputs: Supports 6 PWM outputs for controlling LED brightness and compatible motor drivers.
-
Analogue Inputs: Provides analogue input connections for reading sensor signals. The number of exposed analogue connections can vary by board.
-
External USB Programming: Uses a compatible USB-to-serial adapter for uploading programs.
-
Arduino IDE Compatibility: Supports Arduino programming tools and a wide range of compatible libraries.
-
Low-Power Applications: Available in different voltage and clock-speed configurations to suit different project requirements.
Arduino Pro Mini 3.3V vs 5V
Arduino Pro Mini development boards are commonly available in two configurations: 3.3V operating voltage at 8MHz and 5V operating voltage at 16MHz.
Choosing the correct version is important because the operating voltage affects compatibility with sensors, communication modules and other electronic components.
|
Feature |
Pro Mini 3.3V |
Pro Mini 5V |
|---|---|---|
|
Microcontroller |
ATmega328P |
ATmega328P |
|
Operating voltage |
3.3V |
5V |
|
Clock speed |
8MHz |
16MHz |
|
Digital I/O pins |
14 |
14 |
|
PWM outputs |
6 |
6 |
|
Flash memory |
32KB |
32KB |
|
SRAM |
2KB |
2KB |
|
EEPROM |
1KB |
1KB |
|
Typical applications |
Low-voltage electronics and battery-powered projects |
5V electronics and general Arduino projects |
The 3.3V version is suitable for applications using compatible low-voltage sensors and modules, while the 5V version is useful for projects designed around conventional 5V electronics.
Always match the USB-to-serial adapter's logic voltage to the board being programmed.
Technical Specifications of the Arduino Pro Mini
The Pro Mini based on the ATmega328P generally offers the following specifications:
|
Specification |
Details |
|---|---|
|
Microcontroller |
ATmega328P |
|
Processor architecture |
8-bit AVR |
|
Flash memory |
32KB |
|
SRAM |
2KB |
|
EEPROM |
1KB |
|
Digital I/O pins |
14 |
|
PWM outputs |
6 |
|
Analogue inputs |
Typically 6, with some compatible boards exposing additional ADC connections |
|
Clock speed |
8MHz or 16MHz |
|
Operating voltage |
3.3V or 5V |
|
Programming interface |
External USB-to-serial adapter |
|
Programming software |
Arduino IDE |
Specifications may vary between manufacturers and board versions. For example, the listed Aus Electronics Direct iDuino TA0007 is a 5V, 16MHz model with pre-soldered pin headers.
What Can You Build with an Arduino Pro Mini?
The compact size and programmable functionality of the Arduino Pro Mini make it suitable for many electronics applications.
Common project ideas include:
-
Robotics Projects: Control motors, servos and sensors in small robotic systems.
-
Wireless Sensor Systems: Collect and transmit environmental data using compatible wireless modules.
-
Home Automation: Build compact controllers for lighting, temperature monitoring and automated switching.
-
Wearable Electronics: Develop small electronic devices where PCB size and weight are important.
-
Model Railway Controllers: Operate signals, switches, lighting and other model railway accessories.
-
LED Controllers: Create programmable lighting effects and LED control systems.
-
Embedded Electronics: Integrate programmable microcontrollers into custom electronic devices and prototypes.
Arduino Pro Mini vs Arduino Nano vs Arduino Uno
Choosing the right Arduino development board depends on the available installation space, programming requirements and connectivity needs.
|
Feature |
Pro Mini |
Nano (classic) |
Uno R3 |
|---|---|---|---|
|
Microcontroller |
ATmega328P |
ATmega328P |
ATmega328P |
|
Operating voltage |
3.3V or 5V |
5V |
5V |
|
Clock speed |
8MHz or 16MHz |
16MHz |
16MHz |
|
Digital I/O |
14 |
14 |
14 |
|
PWM outputs |
6 |
6 |
6 |
|
Analogue inputs |
Typically 6 |
8 |
6 |
|
Onboard USB |
No |
Yes |
Yes |
|
Typical application |
Compact embedded projects |
Breadboard prototyping |
General-purpose prototyping |
The Pro Mini is particularly suitable for projects where a small footprint and external programming interface are preferred. The Nano offers convenient USB programming in a compact format, while the Uno provides a larger board layout that is useful for prototyping and learning.
How to Program an Arduino Pro Mini
Unlike the Arduino Uno and Nano, the Pro Mini does not include an onboard USB-to-serial interface. An external USB-to-TTL adapter is required to upload sketches from a computer.
To program the board:
-
Connect a compatible USB-to-serial adapter to the Pro Mini's programming pins.
-
Match the adapter's logic voltage to the Pro Mini's operating voltage.
-
Connect the adapter's TX and RX signals to the corresponding RX and TX pins on the board.
-
Connect GND and the appropriate power connection.
-
Open the Arduino IDE and select the appropriate Pro or Pro Mini board configuration and processor variant.
-
Select the correct serial port and upload your program.
A compatible adapter with DTR or automatic reset support can simplify the programming process.
How to Choose the Right Pro Mini Development Board
Before purchasing an Arduino Pro Mini development board, consider these important factors:
-
Operating Voltage: Choose between 3.3V and 5V based on your connected electronics.
-
Clock Speed: Select 8MHz or 16MHz according to the required processing speed and board configuration.
-
Microcontroller Compatibility: Check whether the board uses an ATmega328P or another compatible processor.
-
Input and Output Pins: Ensure the board provides enough connections for your sensors, motors and other components.
-
Programming Adapter: Make sure you have a compatible USB-to-serial adapter for uploading programs.
-
Physical Dimensions: Consider the PCB size and mounting requirements for your project.
-
Power Requirements: Check the input voltage range and current requirements of your particular board.
Essential Accessories for Arduino Pro Mini Projects
To get the most out of an Arduino Pro Mini, consider adding compatible accessories such as USB-to-serial adapters, breadboards, jumper wires, sensors, resistors and electronic modules.
A USB-to-TTL adapter is particularly important because it provides the programming connection that is not built into the Pro Mini itself. Breadboards and jumper wires make it easier to prototype circuits before integrating the board into a finished project.
Frequently Asked Questions – Arduino Pro Mini Development Boards
1. What is an Arduino Pro Mini development board?
An Arduino Pro Mini development board is a compact microcontroller board based on the ATmega328P processor. It is designed for electronics prototyping, embedded systems and DIY projects where space and weight are important considerations. The board provides digital and analogue input/output connections and is compatible with the Arduino IDE, making it suitable for a wide range of programmable electronic applications.
2. What is the Arduino Pro Mini used for?
The Arduino Pro Mini is used to develop compact electronic devices and embedded control systems. Common applications include robotics, wearable electronics, wireless sensor networks, home automation, LED controllers and battery-powered projects. Its small PCB size makes it particularly useful for applications where larger development boards may not fit.
3. What microcontroller does the Arduino Pro Mini use?
The standard Arduino Pro Mini uses the ATmega328P 8-bit AVR microcontroller. It typically operates at either 8MHz or 16MHz, depending on the board version. The ATmega328P includes 32KB of flash memory, 2KB of SRAM and 1KB of EEPROM for storing programs and data.
4. What is the difference between Arduino Pro Mini 3.3V and 5V?
The main differences are operating voltage and clock speed. The 3.3V Arduino Pro Mini typically operates at 8MHz, while the 5V version generally operates at 16MHz.
-
3.3V Pro Mini: Suitable for low-voltage electronics, compatible sensors and battery-powered applications.
-
5V Pro Mini: Suitable for projects using conventional 5V electronic components and modules.
Both versions generally use the ATmega328P microcontroller and provide similar input/output functionality. Ensure that connected components and programming adapters use compatible logic voltage levels.
5. What is the difference between Arduino Pro Mini and Arduino Nano?
The Arduino Pro Mini and Arduino Nano are both compact development boards commonly based on the ATmega328P microcontroller. The main difference is USB connectivity.
The Pro Mini does not have an onboard USB-to-serial interface and requires an external adapter for programming. The Nano includes an onboard USB interface, allowing it to connect directly to a computer using a compatible USB cable.
The Pro Mini is ideal for compact embedded applications, while the Nano is convenient for breadboard prototyping and projects requiring straightforward USB programming.
6. What is the difference between Arduino Pro Mini and Arduino Uno?
The Arduino Pro Mini and Arduino Uno are both commonly based on the ATmega328P microcontroller, but they differ in physical size and connectivity.
The Pro Mini features a much smaller PCB and does not include an onboard USB programming interface. The Uno has a larger board layout, onboard USB connectivity and convenient connectors for prototyping and expansion.
The Pro Mini is better suited to compact embedded installations, while the Uno is popular for learning, experimentation and general-purpose electronics development.
7. How many digital pins does an Arduino Pro Mini have?
The standard Arduino Pro Mini provides 14 digital input/output pins. These pins can be configured as inputs to read signals from buttons and sensors or as outputs to control LEDs, relays and other compatible electronic components.
8. How many PWM outputs does an Arduino Pro Mini support?
The standard Arduino Pro Mini supports 6 PWM output pins. Pulse Width Modulation (PWM) allows the board to control functions such as LED brightness, motor speed and other devices that respond to variable output signals.
9. How many analogue inputs does an Arduino Pro Mini provide?
The standard Arduino Pro Mini provides 6 analogue input pins. These inputs allow the microcontroller to measure varying voltage levels from compatible sensors, potentiometers and other analogue devices. The analogue inputs are useful for applications such as temperature monitoring, light detection and environmental sensing.
10. Does the Arduino Pro Mini have a built-in USB port?
No. The standard Arduino Pro Mini does not include a built-in USB port or USB-to-serial converter. An external USB-to-TTL serial adapter is required to connect the board to a computer for programming. This simplified design helps reduce the board's size and makes it suitable for compact embedded applications.
11. How do I program an Arduino Pro Mini?
To program an Arduino Pro Mini, you need a compatible USB-to-serial adapter and the Arduino IDE.
Follow these steps:
-
Connect the USB-to-serial adapter to your computer.
-
Connect the adapter's TX, RX and GND pins to the corresponding programming connections on the Pro Mini.
-
Connect the appropriate power and reset signals as required.
-
Open the Arduino IDE.
-
Select the appropriate Pro or Pro Mini board configuration.
-
Select the correct processor variant, such as 3.3V 8MHz or 5V 16MHz.
-
Choose the correct serial port and upload your program.
An adapter with DTR support can make automatic resetting easier during programming.
12. What USB-to-serial adapter do I need for an Arduino Pro Mini?
You need a USB-to-TTL serial adapter that supports the Arduino Pro Mini's programming interface. Common adapters use CP2102, CH340 or FT232 USB-to-serial chips.
The adapter should support the appropriate logic voltage for your board, either 3.3V or 5V. Look for an adapter with TX, RX, GND and DTR connections to simplify programming and automatic reset functionality.
13. What voltage does an Arduino Pro Mini require?
Arduino Pro Mini boards are commonly available in 3.3V and 5V operating versions. The voltage requirements depend on the specific board design.
Many standard Pro Mini variants use a regulated external supply through the RAW input, commonly within approximately 5–12V, although the recommended input range should be checked for the individual model. The VCC pin requires the board's regulated operating voltage. Avoid applying an unregulated supply directly to VCC.
14. Is the Arduino Pro Mini suitable for beginners?
Yes. The Arduino Pro Mini is suitable for beginners who want to learn microcontroller programming, electronics and embedded systems. It supports the Arduino IDE and a wide range of example programs and libraries.
However, beginners should be aware that it requires an external USB-to-serial adapter for programming. Those who prefer direct USB connectivity may find the Arduino Uno or Nano easier to get started with.
15. What projects can I build with an Arduino Pro Mini?
The Arduino Pro Mini can be used for many electronics and programming projects, including:
-
Robotics: Control motors, servos and sensors in compact robotic systems.
-
Wireless Sensor Networks: Collect and transmit environmental measurements using compatible wireless modules.
-
Home Automation: Develop programmable lighting, temperature monitoring and switching systems.
-
Wearable Electronics: Create small interactive electronic devices.
-
LED Controllers: Build programmable lighting effects and brightness controllers.
-
Model Railway Systems: Control signals, lighting and other model railway accessories.
-
Battery-Powered Devices: Develop portable electronic systems with suitable power management.
16. Is the Arduino Pro Mini compatible with Arduino sensors and modules?
Yes. The Arduino Pro Mini is compatible with many Arduino sensors, electronic modules and expansion components. It can communicate with compatible devices using digital I/O, analogue inputs and communication protocols such as I2C, SPI and UART.
However, compatibility depends on operating voltage, logic levels, pin assignments and communication requirements. Check the specifications of each sensor or module before connecting it to the board.
17. How do I power an Arduino Pro Mini?
An Arduino Pro Mini can be powered using several methods:
-
RAW input: Connect a suitable regulated or unregulated DC supply within the board manufacturer's recommended input range. The onboard regulator supplies the operating voltage.
-
VCC input: Supply the correct regulated operating voltage directly to the VCC pin.
-
Battery supply: Use a compatible battery configuration that meets the board's voltage requirements.
-
External regulated power supply: Use a suitable regulated source for projects requiring continuous operation.
Always check the board's voltage specifications and polarity before connecting a power source.
18. What is the difference between a genuine Arduino Pro Mini and an Arduino-compatible board?
A genuine Arduino Pro Mini is an official Arduino product manufactured to Arduino's specifications. An Arduino-compatible board is produced by another manufacturer and is designed to work with the Arduino programming environment.
Compatible boards may offer similar functionality and use the same ATmega328P microcontroller, but they can differ in component quality, PCB layout, voltage regulation, clock speed and manufacturing standards. Check individual product specifications to ensure compatibility with your project.
19. Can an Arduino Pro Mini run on battery power?
Yes. The Arduino Pro Mini can operate using battery power, making it useful for portable electronics, wireless sensors and remote monitoring projects.
The 3.3V 8MHz version is often suitable for low-power applications, particularly when combined with appropriate power management techniques. Battery life depends on the battery capacity, connected components, operating conditions and power consumption of the complete circuit.
For longer operating times, developers can use sleep modes, reduce unnecessary power consumption and select suitable battery and voltage regulation arrangements.
20. What accessories do I need to use an Arduino Pro Mini?
The accessories you need depend on your project, but commonly used components include:
-
USB-to-TTL serial adapter: Required for uploading programs from a computer.
-
Microcontroller breadboard: Useful for assembling and testing circuits.
-
Jumper wires: Connect the board to sensors, modules and other components.
-
Sensors and modules: Add temperature, light, motion and other measurement capabilities.
-
LEDs and resistors: Useful for basic electronics experiments and output control.
-
Battery holders and power supplies: Provide suitable power for portable and embedded applications.
-
Electronic components: Include capacitors, transistors, switches and other circuit-building parts.
These accessories make it easier to prototype, test and develop projects using an Arduino Pro Mini.