
Categories
- Spare Parts
- Quadcopter
- Aquaculture
- Raspberry Pi
- Video
- Components
- Gadgets
- Auto & Outdoors
- Home Automation & Security
- Audio
- Mobile Accessories
- IT
- Tools, Test & Mesurement
- Hobby
- Drones
- Drone Battery
- Spare Parts
- Remote Control Drone
- Fishing Release
- Racing Drones
- Autel EVO 2
- FPV Drone
- Mini Drone
- Drone with Camera
- Drones with FPV Display
- Beginner Drones
- GPS Drone
- Wifi FPV Drones
- Waterproof Fishing Drone
-
DJI Drones
- DJI Drone Accessories
- DJI Air 2S
- DJI Drone Spare Parts
- DJI Enterprise
- DJI FPV Racing Drone
- DJI Inspire Drone
- DJI Mavic Air
- DJI Mavic Drone
- DJI Mavic Mini
- DJI Mavic Mini 2
- DJI Spark Drone
- iFlight Racing Drones
- Mavic 2
- Mavic air 2
- Mavic Air 2 fly More combo
- Mavic Air 2 RTF
- Mavic Pro Platinum
- Phantom 3 Drone
- Phantom 4 Advance
- Phantom 4 Drone
- Phantom 4 Pro
- LED Light
- LED Lantern
- LED String / Fairy Lights
- LED Work Light
- LED Party Lights
- LED Torch
- LED Head Torch
- Household LED Light
- 12V LED Lights
-
LED Strip Lights
- Green LED Strip Light
- Power Supply
- Red Led Strip Light
- USB LED Strip Light
- Yellow LED Strip Light
- Accessory
- Blue LED Strip Light
- Neon LED Strip Light
- Rigid LED Strip Lights
- White Led Strip Light
- RGBW LED Strip Lights
- Digital LED Light Strip
- 2835 LED Strip Light Kits
- RGB LED Strip Light
- 5050 LED Light Strip Kit
- Toys
- HDMI
- HDCP Converter
- IQ4 Compatible HDMI Products
- HDMI Wall Plate Socket
- HDMI Audio Extractor
- HDMI Matrix Switcher
- HDMI Wireless Transmitter and Receiver
- HDMI Extender
- HDMI Converter
- HDMI Splitter
- HDMI Switch
- HDMI Adapter
-
HDMI Cable
- Mini Display Port
- Display Port
- Amplified HDMI Cable
- DVI Cable
- HDMI to VGA Cable
- HDMI to Micro HDMI Cable
- HDMI to DVI Cable
- HDMI to Mini HDMI
- Premium High Speed HDMI Cable with Ethernet
- High Speed HDMI Cable with Ethernet
- Hybrid Fibre Optic HDMI 2.0 Cable
- HDMI 2.0 Cable
- 8K HDMI Cable
- 4K HDMI Cable
- Hybrid Fibre Optic HDMI 2.1 Cable
- Media Player & Set Top Box
- Arduino Projects
- Power
- Battery Tester
- Transformer
- DC Power Cable & Connectors
- Solar
- Switchmode Power Supply
- AC Power Cables, Plugs and Sockets
- Powerboard and Adaptors
- Travel Adapter
- Battery Chargers
- Batteries
- USB Charger
-
GPO & Light Switch
- Electrical Accessories
- Circuit breaker & Timers
- Distribution Box
- Plug Base Socket
- Weatherproof Socket
- Black Light Switches
- Clipsal Style White
- Smart Zigbee Power Switch
- Black Power Points
- Smart Zigbee Power Socket
- Slim Series
- Alpha Series
- GPO Wall Sockets
- Power & Light Switch
- Glass Series
- Smart Wifi Power Socket
- Smart Wifi Light Switch
- Switch Mechanisms
-
Power Adapter
- Extension Cables, Splitters and Plugs
- Reversible DC Plug
- Linear Type
- UPS
- Multi-voltage Power Adapter
- 14V DC Power Adapter
- 13.8V DC Power Adapter
- 3.3V Power Adapter
- 19V DC Power Adapter
- 7.5V DC Power Adapter
- Variable Power Supply
- USB Power Adapter
- 18V DC Power Adapter
- 48V Power Supply
- AC Power Adapter
- 24V DC Power Adapter
- 15V DC Power Adapter
- 9V DC Power Adapter
- 6V DC Power Adapter
- 5V DC Power Adapter
- 12V DC Power Adapter
Information
TA0670 ESP32 DEVELOPMENT BOARD WITH OV2640 CAMERA MODULE WI-FI & BLUETOOTH FOR ARDUINO
Author: Aus Electronics Direct Date Posted:18 March 2022
TA0670 ESP32 DEVELOPMENT BOARD WITH OV2640 CAMERA MODULE WI-FI & BLUETOOTH FOR ARDUINO
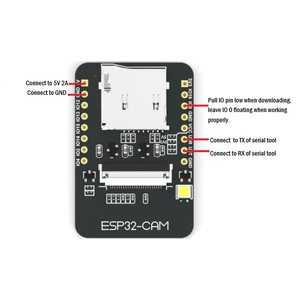
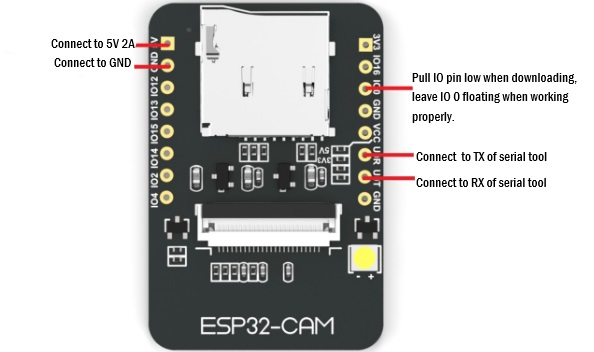
Connection Diagram
1. Build ESP32 Development environment
Build the environment: https://esp-idf.readthedocs.io/zh_CN/latest/get-started/index.html
Operations in virtual machine:
To help developers to get started easily, we integrate esp32 and esp8266 into lubuntu 32bit virtual machine. Please open the virtual machine on VMware12 environment above. Users need to download it by themselves.
Virtual machine setting recommendation
- 2-core CPU
- 1G memory at least
- Virtual machine account: ai-thinker
- Password: aithinker
Functions
- Integrate ESP32 and ESP8266
- Support one-click update
Operations steps
-
Download image, virtual machine image address: http://download3.dfrobot.com.cn/files/lubuntu_esp32_v2.0.7z
-
Install VMware12, open VMware software, import the virtual machine image
-
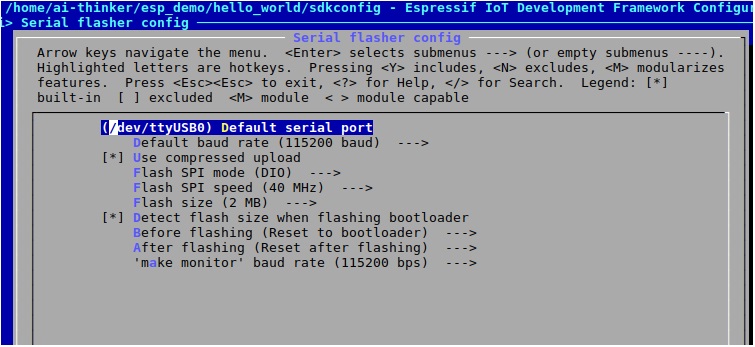
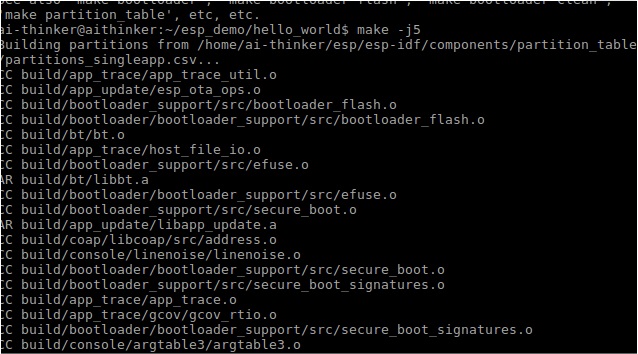
Open LX terminal, enter catelogue: /home/ai-thinker/esp_demo/hello_world
.jpg)
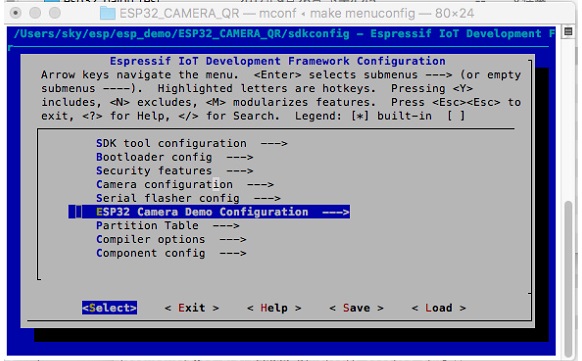
- Input make menuconfig, revise serial port at Serial flasher config→Default serial port
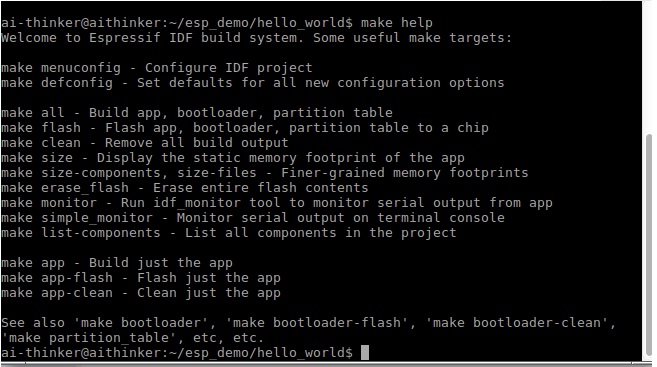
- Input make help to check compiling instruction.
- Input make-j5 to compile source codes.
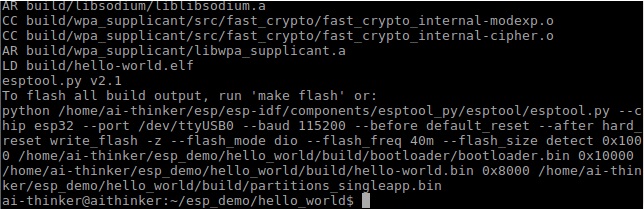
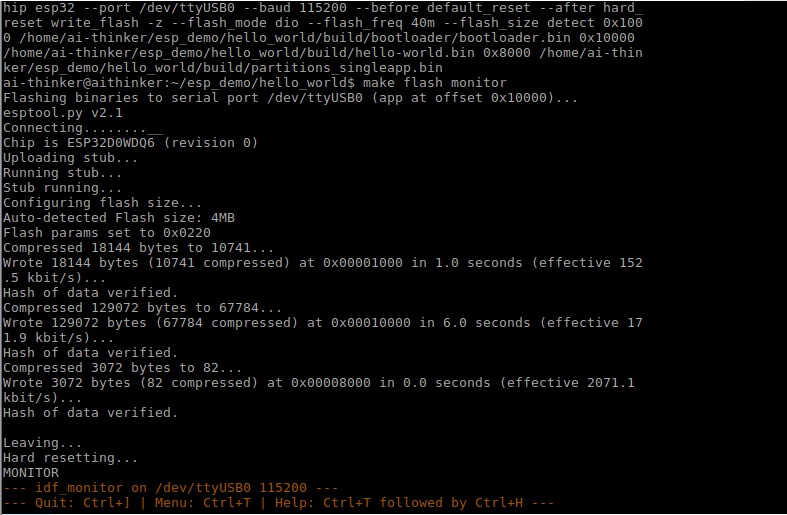
- Plug the esp32 module, connect to computer when detecting serial tool, and input command make flash monitor. then you can download binary files to esp32 moddule and check the serial port debug information.
Note: do not change the files in /home/ai-thinker/esp catelogue, otherwise compiling error may happen.
The version of esp-idf used in this demo is 3.01-c(c2b39f4a5f4234d3276bec40d42132589739d655) Download address: https://github.com/espressif/esp-idf/releases/tag/v3.0.1-rc
2. Download
- Download codes: git clone https://github.com/donny681/ESP32_CAMERA_QR.git
- Download submodule: git submodule update --init
3. Revise parameters
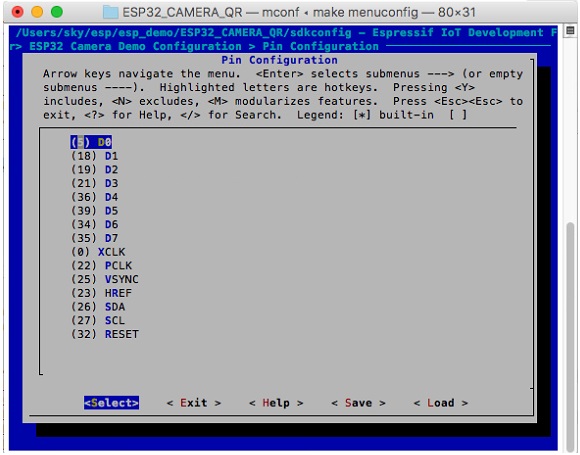
Input "make menuconfig", configure WIFI and Camera parameters.
4. Open file app_main.c, revise CAMERA_FRAME_SIZE, MERA_FRAME_SIZE(picture size) macro define(default configure JPEG)
5. Input "make flash monitor" onto terminal, compile the project and burn.
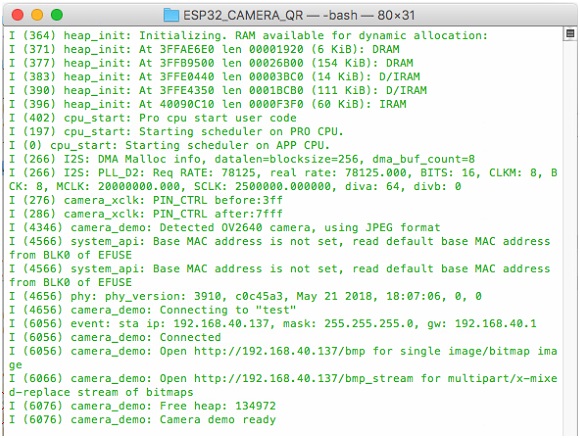
6. Check the serial port information or module IP information. Input http://module ip address+"/jpg to get the image, and please make sure that your computer and module are in the same LAN.
For example, the address the module got is 192.168.40.148.
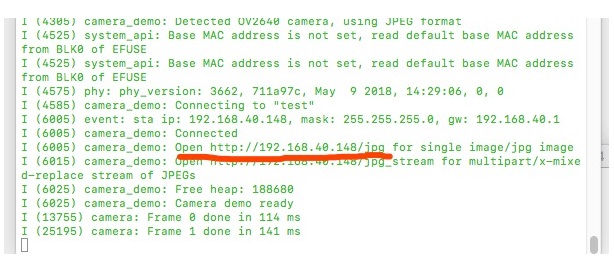
Input "http://192.168.40.148/jpg" into the broswer, then you can get the image information.
