
How to Guide for Arduino Ultrasonic Car Kit
Author: OpenPlatform Date Posted:4 June 2016
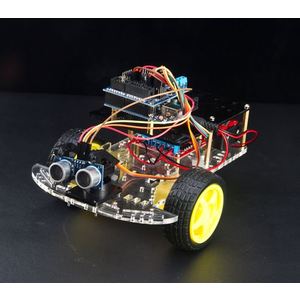
How to Guide for Arduino Ultrasonic Car Kit
Introduction
This ultrasonic DIY car kit is based on Arduino development board(open source electronic platform). In this manual, we mainly use four Arduino parts: IDUINO uno board(Compatible with arduino); Ultrasonic module; L298N motor driver board; Arduino sensor extension board. All of this parts are very common used in Arduino project. And if you want to learn or use other module like infrared received module, Bluetooth module; or RF module, just replace Ultrasonic module with these module, then you can make a infrared remote car or Bluetooth car and so on…
Component list
- IDUINO UNO R3 *1
- L298N motor driver board*1
- Arduino sensor extension board *1
- Ultrasonic module *1
- SG90 servo*1
- Car chassis *2
- Car Wheels 2
- DC Gear Motor(1:48) *2
- 20 line encoder *2
- Fasteners *4
- Universal wheel*1
- 18650 battery box *1
- Several screw nut
- Servo holder*1
Install steps
Step1: install the car chassis
 _docx - Microsoft Word.png)
Firstly, You need plug the encoder in the motor.
 _docx - Microsoft Word.png)
Second, use 2 fasteners to fix one motor on the bottom board. Please note which hole should be used and the motor’s direction should be forward.
 _docx - Microsoft Word.jpg)
 _docx - Microsoft Word.jpg)
 _docx - Microsoft Word.jpg)
Plug the rubber wheel in the motor, please note the angle of the socket on the wheel.
 _docx - Microsoft Word.jpg)
Then, install the universal wheel, please note which hole should be used on the board.
 _docx - Microsoft Word.jpg)
 _docx - Microsoft Word.jpg)
Then the first step finished as the following picture:
 _docx - Microsoft Word.jpg)
Step2: Fix the main component on the car chassis
First, Fix the L298N driver board.
 _docx - Microsoft Word.jpg)
Before you fix the screw, passing the wire on the motor through the board helps your next step.
 _docx - Microsoft Word.jpg)
Then connect the L298N module with the motor, please note which wire should be fixed on which screw, the red wire is VCC and the black wire is GND.
 _docx - Microsoft Word.jpg)
Then fix the 18650 battery box like the following picture.
 _docx - Microsoft Word.jpg)
We have other three parts need to be fixed, the IDUINO uno, sensor extension board and ultrasonic module. If we put these part also on the one acrylic board used on the above step, the space may be crowded, which makes the appearance of the ultrasonic car not beautiful. So in the next step, we can use another acrylic board. We can fix the IDUINO uno the board first, then fix the new board on the bottom board.
 _docx - Microsoft Word.jpg)
 _docx - Microsoft Word.jpg)
 _docx - Microsoft Word.jpg)
 _docx - Microsoft Word.jpg)
Then, Fix the ultrasonic module. In this step, we need a middleware to connect the car with the ultrasonic module. The middleware actually a FPV holder, like the following picture:
 _docx - Microsoft Word.jpg)
In order to fit the holder, we need cut the rubber holder cross as the same length on four direction.
Cut this
 _docx - Microsoft Word.jpg)
To this
 _docx - Microsoft Word.jpg)
This step need a sharp knife, you must be careful. Then put this cross in the holder like following:
 _docx - Microsoft Word.jpg)
And fix the holder on the bottom board:
 _docx - Microsoft Word.jpg)
Fix the servo: Plug the servo in the holder and fix it with screw.
 _docx - Microsoft Word.jpg)
 _docx - Microsoft Word.jpg)
Fix the ultrasonic module:
This step we need 2 ribbon to fix the ultrasonic module on the holder.
 _docx - Microsoft Word.jpg)
 _docx - Microsoft Word.jpg)
Then combination the whole servo holder together with screw.
 _docx - Microsoft Word.jpg)
 _docx - Microsoft Word.jpg)
Then plug the sensor extension board in the uno board.
 _docx - Microsoft Word.jpg)
Step 3: Wire connection and upload code.
In this step, we need connect wire as the following picture.
 _docx - Microsoft Word.jpg)
After the connection, upload the following code to your IDUINO board. Then power on the uno board and L298N module, the ultrasonic car starts moving.
 _docx - Microsoft Word.jpg)
 _docx - Microsoft Word.jpg)
********Code begin********
#include <Servo.h>
int pinLB=6; // define pin6 as left back connect with IN1
int pinLF=9; // define pin9 as left forward connect with IN2
int pinRB=10; // define pin10 as right back connect with IN3
int pinRF=11; // define pin11 as right back connect with IN4
int inputPin = A0; // define ultrasonic receive pin (Echo)
int outputPin =A1; // define ultrasonic send pin(Trig)
int Fspeedd = 0; // forward distance
int Rspeedd = 0; // right distance
int Lspeedd = 0; // left distance
int directionn = 0; //
Servo myservo; // new myservo
int delay_time = 250; // set stable time
int Fgo = 8; // forward
int Rgo = 6; // turn right
int Lgo = 4; // turn left
int Bgo = 2; // back
void setup()
{
Serial.begin(9600);
pinMode(pinLB,OUTPUT);
pinMode(pinLF,OUTPUT);
pinMode(pinRB,OUTPUT);
pinMode(pinRF,OUTPUT);
pinMode(inputPin, INPUT);
pinMode(outputPin, OUTPUT);
myservo.attach(5); // define the servo pin(PWM)
}
void advance(int a) // forward
{
digitalWrite(pinRB,LOW);
digitalWrite(pinRF,HIGH);
digitalWrite(pinLB,LOW);
digitalWrite(pinLF,HIGH);
delay(a * 100);
}
void turnR(int d) //turn right
{
digitalWrite(pinRB,LOW);
digitalWrite(pinRF,HIGH);
digitalWrite(pinLB,HIGH);
digitalWrite(pinLF,LOW);
delay(d * 100);
}
void turnL(int e) //turn left
{
digitalWrite(pinRB,HIGH);
digitalWrite(pinRF,LOW);
digitalWrite(pinLB,LOW);
digitalWrite(pinLF,HIGH);
delay(e * 100);
}
void stopp(int f) //stop
{
digitalWrite(pinRB,HIGH);
digitalWrite(pinRF,HIGH);
digitalWrite(pinLB,HIGH);
digitalWrite(pinLF,HIGH);
delay(f * 100);
}
void back(int g) //back
{
digitalWrite(pinRB,HIGH);
digitalWrite(pinRF,LOW);
digitalWrite(pinLB,HIGH);
digitalWrite(pinLF,LOW);
delay(g * 100);
}
void detection() //test the distance of different direction
{
int delay_time = 250; //
ask_pin_F(); // read forward distance
if(Fspeedd < 10) // if distance less then 10
{
stopp(1);
back(2);
}
if(Fspeedd < 25) // if distance less then 10
{
stopp(1);
ask_pin_L();
delay(delay_time);
ask_pin_R();
delay(delay_time);
if(Lspeedd > Rspeedd) //if left distance more than right distance
{
directionn = Rgo;
}
if(Lspeedd <= Rspeedd)//if left distance not more than right //distance
{
directionn = Lgo;
}
if (Lspeedd < 10 && Rspeedd < 10) //if left distance and right //distance both less than 10
{
directionn = Bgo;
}
}
else
{
directionn = Fgo; // forward go
}
}
void ask_pin_F() // test forward distance
{
myservo.write(90);
digitalWrite(outputPin, LOW);
delayMicroseconds(2);
digitalWrite(outputPin, HIGH);
delayMicroseconds(10);
digitalWrite(outputPin, LOW);
float Fdistance = pulseIn(inputPin, HIGH);
Fdistance= Fdistance/5.8/10;
Serial.print("F distance:");
Serial.println(Fdistance);
Fspeedd = Fdistance;
}
void ask_pin_L() // test left distance
{
myservo.write(5);
delay(delay_time);
digitalWrite(outputPin, LOW);
delayMicroseconds(2);
digitalWrite(outputPin, HIGH);
delayMicroseconds(10);
digitalWrite(outputPin, LOW);
float Ldistance = pulseIn(inputPin, HIGH);
Ldistance= Ldistance/5.8/10;
Serial.print("L distance:");
Serial.println(Ldistance);
Lspeedd = Ldistance;
}
void ask_pin_R() // test right distance
{
myservo.write(177);
delay(delay_time);
digitalWrite(outputPin, LOW);
delayMicroseconds(2);
digitalWrite(outputPin, HIGH);
delayMicroseconds(10);
digitalWrite(outputPin, LOW);
float Rdistance = pulseIn(inputPin, HIGH);
Rdistance= Rdistance/5.8/10;
Serial.print("R distance:");
Serial.println(Rdistance);
Rspeedd = Rdistance;
}
// code from www.openplatform.cc
void loop()
{
myservo.write(90);
detection();
if(directionn == 2)
{
back(8);
turnL(2);
Serial.print(" Reverse ");
}
if(directionn == 6)
{
back(1);
turnR(6);
Serial.print(" Right ");
}
if(directionn == 4)
{
back(1);
turnL(6);
Serial.print(" Left ");
}
if(directionn == 8)
{
advance(1);
Serial.print(" Advance ");
Serial.print(" ");
}
}
********Code End********
Above all, the DIY ultrasonic Arduino car finish. This car kit offer you a learning platform, basing on this car, you can learn other project module(Bluetooth, infrared remoter and wifi video module), and make your smart car. Even the chassis also can replace a more powerful one, also a tank chassis, that’s would be very fun.
