
Categories
- Spare Parts
- Quadcopter
- Aquaculture
- Raspberry Pi
- Video
- Components
- Gadgets
- Auto & Outdoors
- Home Automation & Security
- Audio
- Mobile Accessories
- IT
- Tools, Test & Mesurement
- Hobby
- Drones
- Drone Battery
- Spare Parts
- Remote Control Drone
- Fishing Release
- Racing Drones
- Autel EVO 2
- FPV Drone
- Mini Drone
- Drone with Camera
- Drones with FPV Display
- Beginner Drones
- GPS Drone
- Wifi FPV Drones
- Waterproof Fishing Drone
-
DJI Drones
- DJI Drone Accessories
- DJI Air 2S
- DJI Drone Spare Parts
- DJI Enterprise
- DJI FPV Racing Drone
- DJI Inspire Drone
- DJI Mavic Air
- DJI Mavic Drone
- DJI Mavic Mini
- DJI Mavic Mini 2
- DJI Spark Drone
- iFlight Racing Drones
- Mavic 2
- Mavic air 2
- Mavic Air 2 fly More combo
- Mavic Air 2 RTF
- Mavic Pro Platinum
- Phantom 3 Drone
- Phantom 4 Advance
- Phantom 4 Drone
- Phantom 4 Pro
- LED Light
- LED Lantern
- LED String / Fairy Lights
- LED Work Light
- LED Party Lights
- LED Torch
- LED Head Torch
- Household LED Light
- 12V LED Lights
-
LED Strip Lights
- Green LED Strip Light
- Power Supply
- Red Led Strip Light
- USB LED Strip Light
- Yellow LED Strip Light
- Accessory
- Blue LED Strip Light
- Neon LED Strip Light
- Rigid LED Strip Lights
- White Led Strip Light
- RGBW LED Strip Lights
- Digital LED Light Strip
- 2835 LED Strip Light Kits
- RGB LED Strip Light
- 5050 LED Light Strip Kit
- Toys
- HDMI
- HDCP Converter
- IQ4 Compatible HDMI Products
- HDMI Wall Plate Socket
- HDMI Audio Extractor
- HDMI Matrix Switcher
- HDMI Wireless Transmitter and Receiver
- HDMI Extender
- HDMI Converter
- HDMI Splitter
- HDMI Switch
- HDMI Adapter
-
HDMI Cable
- Mini Display Port
- Display Port
- Amplified HDMI Cable
- DVI Cable
- HDMI to VGA Cable
- HDMI to Micro HDMI Cable
- HDMI to DVI Cable
- HDMI to Mini HDMI
- Premium High Speed HDMI Cable with Ethernet
- High Speed HDMI Cable with Ethernet
- Hybrid Fibre Optic HDMI 2.0 Cable
- HDMI 2.0 Cable
- 8K HDMI Cable
- 4K HDMI Cable
- Hybrid Fibre Optic HDMI 2.1 Cable
- Media Player & Set Top Box
- Arduino Projects
- Power
- Battery Tester
- Transformer
- DC Power Cable & Connectors
- Solar
- Switchmode Power Supply
- AC Power Cables, Plugs and Sockets
- Powerboard and Adaptors
- Travel Adapter
- Battery Chargers
- Batteries
- USB Charger
-
GPO & Light Switch
- Electrical Accessories
- Circuit breaker & Timers
- Distribution Box
- Plug Base Socket
- Weatherproof Socket
- Black Light Switches
- Clipsal Style White
- Smart Zigbee Power Switch
- Black Power Points
- Smart Zigbee Power Socket
- Slim Series
- Alpha Series
- GPO Wall Sockets
- Power & Light Switch
- Glass Series
- Smart Wifi Power Socket
- Smart Wifi Light Switch
- Switch Mechanisms
-
Power Adapter
- Extension Cables, Splitters and Plugs
- Reversible DC Plug
- Linear Type
- UPS
- Multi-voltage Power Adapter
- 14V DC Power Adapter
- 13.8V DC Power Adapter
- 3.3V Power Adapter
- 19V DC Power Adapter
- 7.5V DC Power Adapter
- Variable Power Supply
- USB Power Adapter
- 18V DC Power Adapter
- 48V Power Supply
- AC Power Adapter
- 24V DC Power Adapter
- 15V DC Power Adapter
- 9V DC Power Adapter
- 6V DC Power Adapter
- 5V DC Power Adapter
- 12V DC Power Adapter
Information
Arduino Ultrasonic Distance Sensor Project
Author: Aus Electronics Direct Date Posted:3 April 2019
Arduino Ultrasonic Distance Measurement Sensor Project
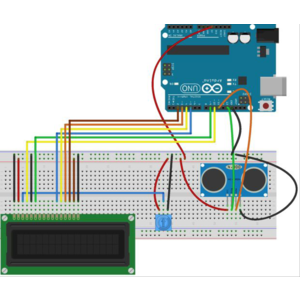
In this Arduino Tutorial we will learn how to use the HC-SR04 Ultrasonic Sensor to display the distance measured on LCD.
The objective of this project is to measure distance using the HC-SR04 Ultrasonic Sensor and display the value on the 2 x 16 LCD module display.
Parts Required :

- 2 x 16 LCD Module:
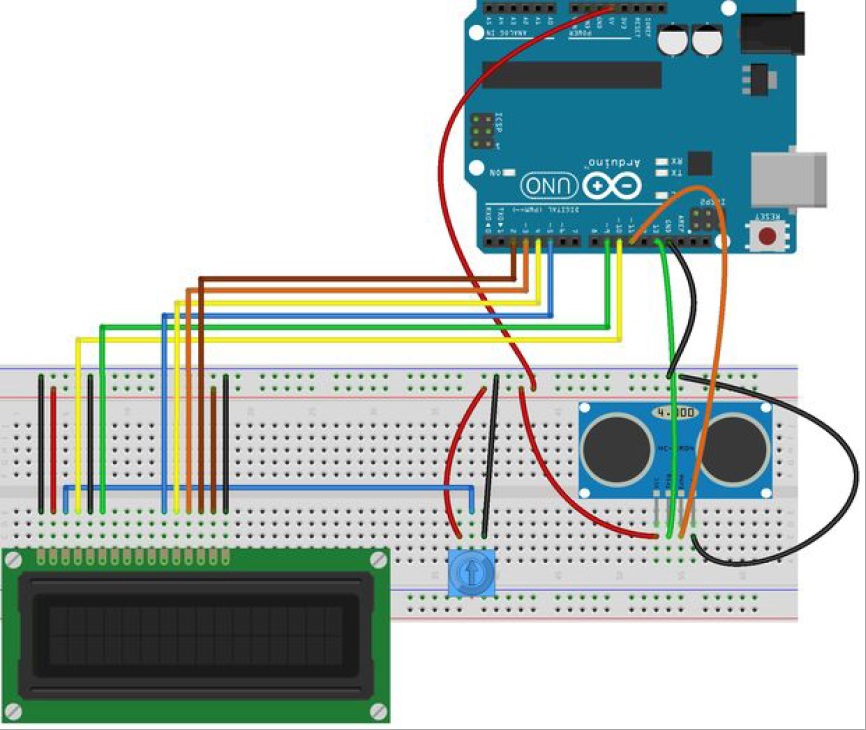
Connect the Cathode to Arduino GND
D7 to Arduino pin 2
Vcc to Arduino 5v
Vcc to Arduino 5v
Trigger to Arduino pin 13
Echo to Arduino pin 11
Gnd to Arduino GND
- Connect the potentiometer to GND and Vcc as shown in the wiring diagram above
#include <LiquidCrystal.h> //Load Liquid Crystal Library
LiquidCrystal LCD(10, 9, 5, 4, 3, 2); //Create Liquid Crystal Object called LCD
int trigPin=13; //Sensor Trip pin connected to Arduino pin 13
int echoPin=11; //Sensor Echo pin connected to Arduino pin 11
int myCounter=0; //declare your variable myCounter and set to 0
int servoControlPin=6; //Servo control line is connected to pin 6
float pingTime; //time for ping to travel from sensor to target and return
float targetDistance; //Distance to Target in inches
float speedOfSound=776.5; //Speed of sound in miles per hour
void setup() {
Serial.begin(9600);
pinMode(trigPin, OUTPUT);
pinMode(echoPin, INPUT);
LCD.begin(16,2); //Tell Arduino to start your 16 column 2 row LCD
LCD.setCursor(0,0); //Set LCD cursor to upper left corner, column 0, row 0
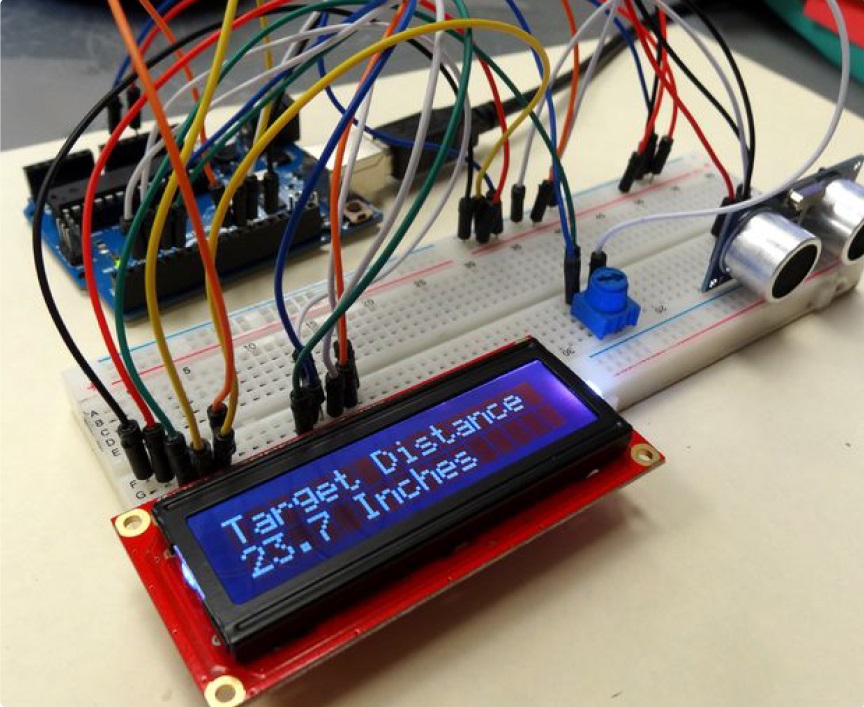
LCD.print("Target Distance:"); //Print Message on First Row
}
void loop() {
digitalWrite(trigPin, LOW); //Set trigger pin low
delayMicroseconds(2000); //Let signal settle
digitalWrite(trigPin, HIGH); //Set trigPin high
delayMicroseconds(15); //Delay in high state
digitalWrite(trigPin, LOW); //ping has now been sent
delayMicroseconds(10); //Delay in high state
pingTime = pulseIn(echoPin, HIGH); //pingTime is presented in microceconds
pingTime=pingTime/1000000; //convert pingTime to seconds by dividing by 1000000 (microseconds in a second)
pingTime=pingTime/3600; //convert pingtime to hourse by dividing by 3600 (seconds in an hour)
targetDistance= speedOfSound * pingTime; //This will be in miles, since speed of sound was miles per hour targetDistance=targetDistance/2; //Remember ping travels to target and back from target.
targetDistance= targetDistance*63360; //Convert miles to inches by multipling by 63360 (inches per mile)
LCD.setCursor(0,1); //Set cursor to first column of second row
LCD.print(" "); //Print blanks to clear the row
LCD.setCursor(0,1); //Set Cursor again to first column of second row
LCD.print(targetDistance); //Print measured distance
LCD.print(" inches"); //Print your units.
delay(250); //pause to let things settle
}
Comments (1)
Is this kit suitable to usea Servo?
By: Allan Hockley on 29 July 2020I am Looking to use this or similar kit to operate a servo that will allow for automatic trim in my boat. Will this work? what other equipment do i need? can you provide codes? any help is greatly appreciated Al
