Categories
- Spare Parts
- Quadcopter
- Aquaculture
- Raspberry Pi
- Video
- Components
- Gadgets
- Auto & Outdoors
- Home Automation & Security
- Audio
- Mobile Accessories
- IT
- Hobby
- Tools, Test & Mesurement
- Drones
- Drone Battery
- Spare Parts
- Remote Control Drone
- Fishing Release
- Racing Drones
- Autel EVO 2
- FPV Drone
- Mini Drone
- Drone with Camera
- Drones with FPV Display
- Beginner Drones
- GPS Drone
- Wifi FPV Drones
- Waterproof Fishing Drone
-
DJI Drones
- DJI Drone Accessories
- DJI Air 2S
- DJI Drone Spare Parts
- DJI Enterprise
- DJI FPV Racing Drone
- DJI Inspire Drone
- DJI Mavic Air
- DJI Mavic Drone
- DJI Mavic Mini
- DJI Mavic Mini 2
- DJI Spark Drone
- iFlight Racing Drones
- Mavic 2
- Mavic air 2
- Mavic Air 2 fly More combo
- Mavic Air 2 RTF
- Mavic Pro Platinum
- Phantom 3 Drone
- Phantom 4 Advance
- Phantom 4 Drone
- Phantom 4 Pro
- LED Light
- LED Lantern
- LED String / Fairy Lights
- LED Work Light
- LED Party Lights
- LED Torch
- LED Head Torch
- Household LED Light
- 12V LED Lights
-
LED Strip Lights
- Green LED Strip Light
- Power Supply
- Red Led Strip Light
- USB LED Strip Light
- Yellow LED Strip Light
- Accessory
- Blue LED Strip Light
- Neon LED Strip Light
- Rigid LED Strip Lights
- White Led Strip Light
- RGBW LED Strip Lights
- Digital LED Light Strip
- 2835 LED Strip Light Kits
- RGB LED Strip Light
- 5050 LED Light Strip Kit
- Toys
- HDMI
- HDCP Converter
- IQ4 Compatible HDMI Products
- HDMI Wall Plate Socket
- HDMI Audio Extractor
- HDMI Matrix Switcher
- HDMI Wireless Transmitter and Receiver
- HDMI Extender
- HDMI Converter
- HDMI Splitter
- HDMI Switch
- HDMI Adapter
-
HDMI Cable
- Mini Display Port
- Display Port
- Amplified HDMI Cable
- DVI Cable
- HDMI to VGA Cable
- HDMI to Micro HDMI Cable
- HDMI to DVI Cable
- HDMI to Mini HDMI
- Premium High Speed HDMI Cable with Ethernet
- High Speed HDMI Cable with Ethernet
- Hybrid Fibre Optic HDMI 2.0 Cable
- HDMI 2.0 Cable
- 8K HDMI Cable
- 4K HDMI Cable
- Hybrid Fibre Optic HDMI 2.1 Cable
- Media Player & Set Top Box
- Arduino Projects
- Power
- Battery Tester
- Transformer
- DC Power Cable & Connectors
- Solar
- Switchmode Power Supply
- Powerboard and Adaptors
- AC Power Cables, Plugs and Sockets
- Travel Adapter
- Battery Chargers
- Batteries
- USB Charger
-
GPO & Light Switch
- Electrical Accessories
- Circuit breaker & Timers
- Distribution Box
- Plug Base Socket
- Weatherproof Socket
- Black Light Switches
- Clipsal Style White
- Smart Zigbee Power Switch
- Black Power Points
- Smart Zigbee Power Socket
- Slim Series
- Alpha Series
- GPO Wall Sockets
- Power & Light Switch
- Glass Series
- Smart Wifi Power Socket
- Smart Wifi Light Switch
- Switch Mechanisms
-
Power Adapter
- Extension Cables, Splitters and Plugs
- Reversible DC Plug
- Linear Type
- UPS
- Multi-voltage Power Adapter
- 14V DC Power Adapter
- 13.8V DC Power Adapter
- 3.3V Power Adapter
- 19V DC Power Adapter
- 7.5V DC Power Adapter
- Variable Power Supply
- USB Power Adapter
- 18V DC Power Adapter
- 48V Power Supply
- AC Power Adapter
- 24V DC Power Adapter
- 15V DC Power Adapter
- 9V DC Power Adapter
- 6V DC Power Adapter
- 5V DC Power Adapter
- 12V DC Power Adapter
Information
Arduino Explained
Author: Aus Electronics Direct Date Posted:9 February 2016
Arduino Explained
Arduino is an open-source prototyping platform based on easy-to-use hardware and software. Arduino boards are able to read inputs such as light on a sensor, a finger on a button, or a Twitter message -and turn it into an output -activating a motor, turning on an LED, publishing something online. You can tell your board what to do by sending a set ofinstructions to the microcontroller on the board. To do so you use the Arduino programming language and the Arduino Software.
The official website is www.arduino.cc and www.arduino.org.
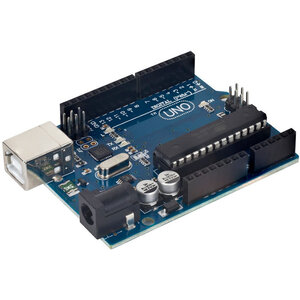
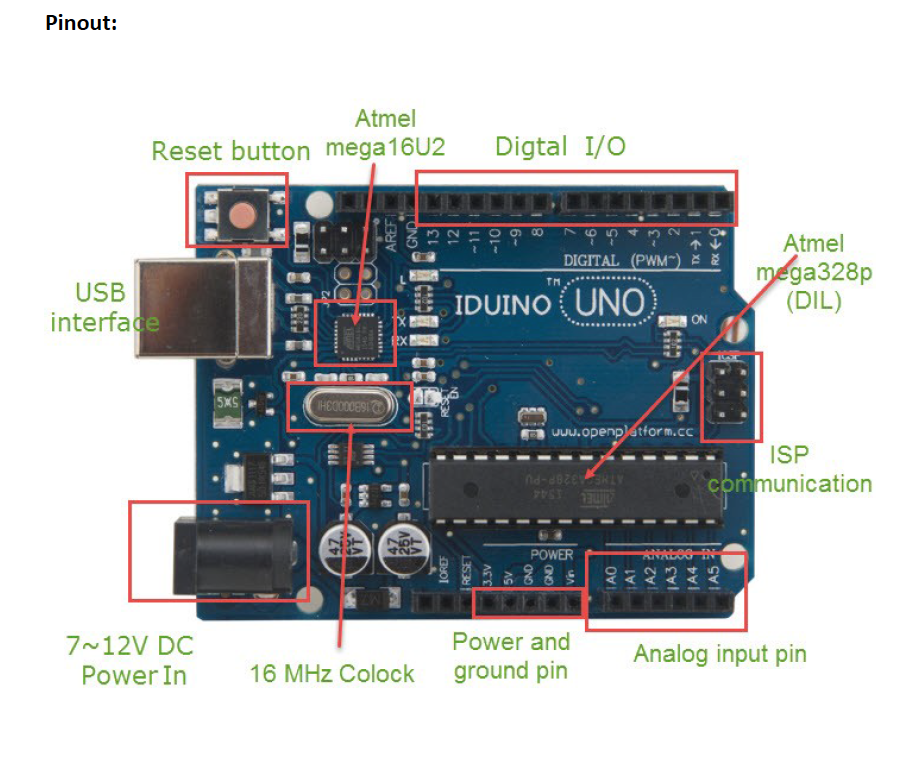
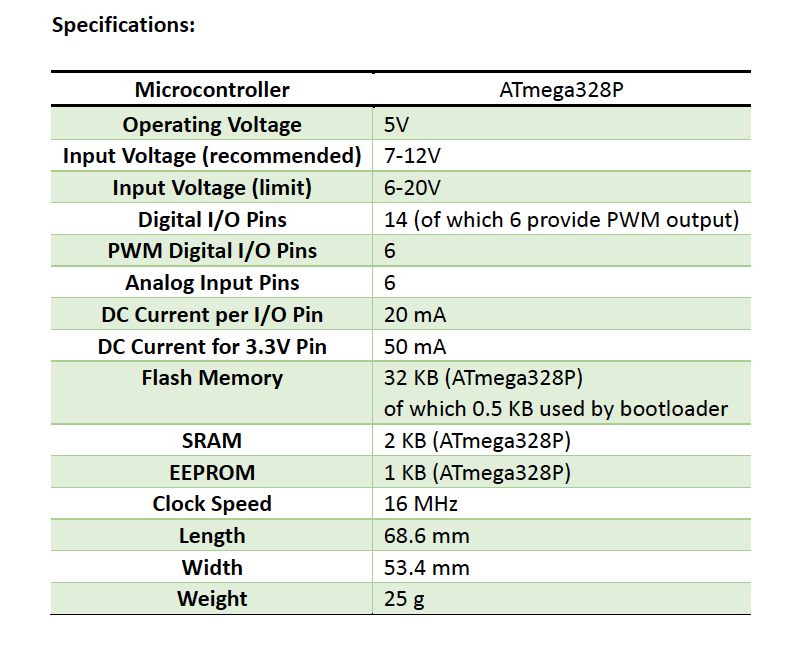
Uno Development Board
The Uno Development Board is a microcontroller board based on the ATmega328P. It has 14 digital input/output pins (of which 6 can be used as PWM outputs), 6 analog inputs, a 16 MHz quartz crystal, a USB connection, a power jack, an ICSP header and a reset button. It contains everything needed to support the microcontroller; simply connect it to a computer with a USB cable or power it with a AC-to-DC adapter or battery to get started.You can tinker with your UNO without worrying too much about doing something wrong, worst case scenario you can replace the chip for a few dollars and start over again.
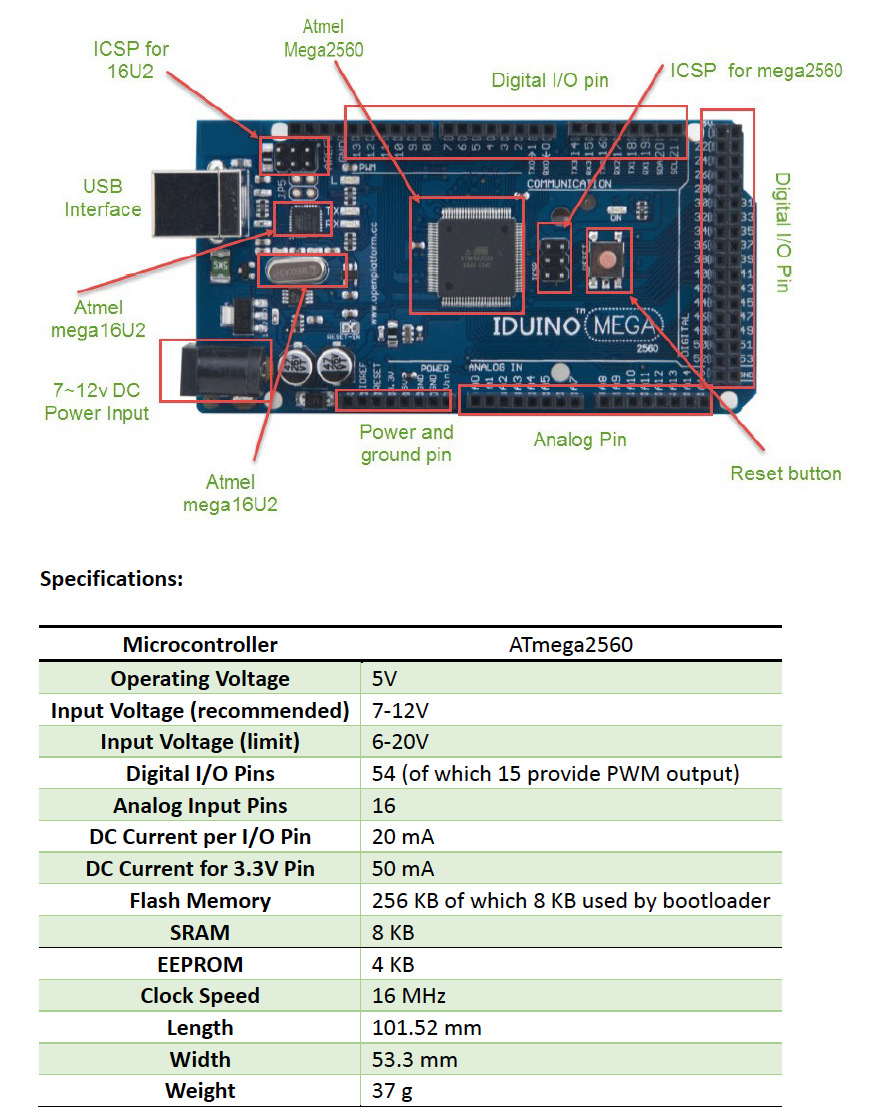
Mega 2560 Development Board
The Mega 2560 is a microcontroller board based on the ATmega2560. It has 54 digital input/output pins (of which 15 can be used as PWM outputs), 16 analog inputs, 4 UARTs (hardware serial ports), a 16 MHz crystal oscillator, a USB connection, a power jack, an ICSP header, and a reset button. It contains everything needed to support the microcontroller; simply connect it to a computer with a USB cable or power it with a AC-to-DC adapter or battery to get started.
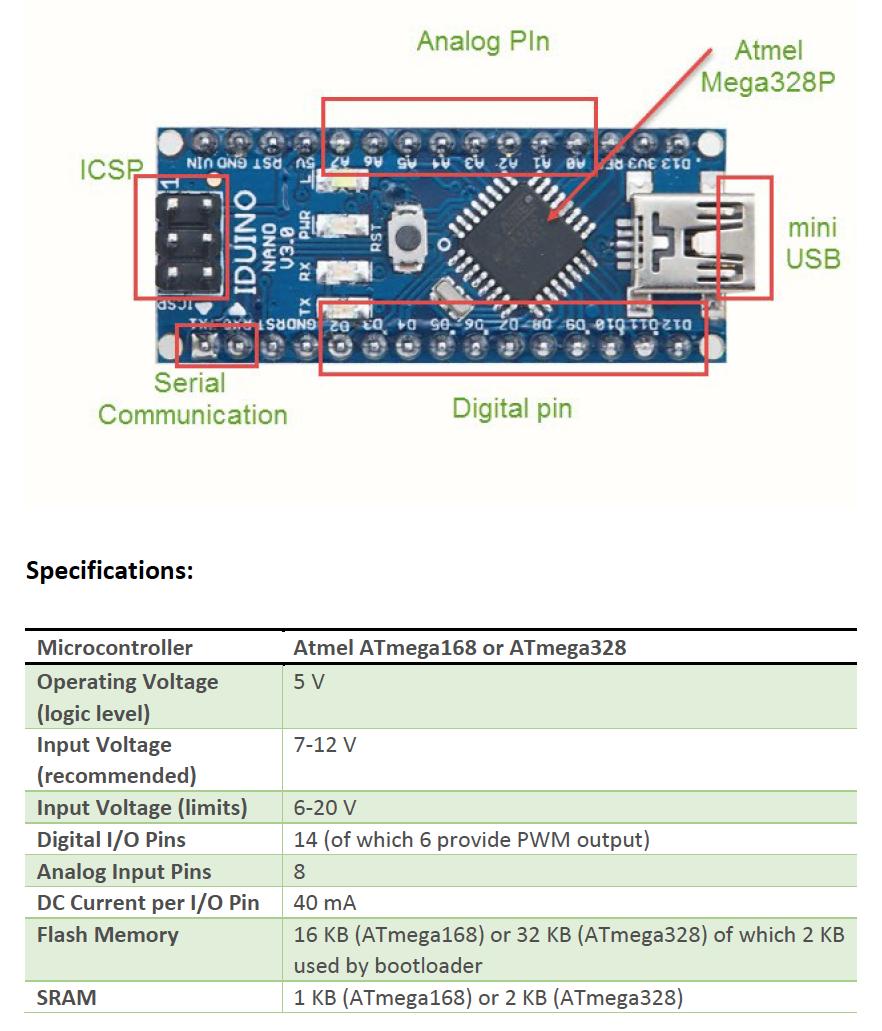
IDUINO Nano
The IDUINONano is a small, complete, and breadboard-friendly board based on the ATmega328 or ATmega168. It has more or less the same functionality of the Arduino Duemilanove, but in a different package. It lacks a DC power jack, and works with a Mini-B USB cable instead of a standard one.
Leonardo Development Board
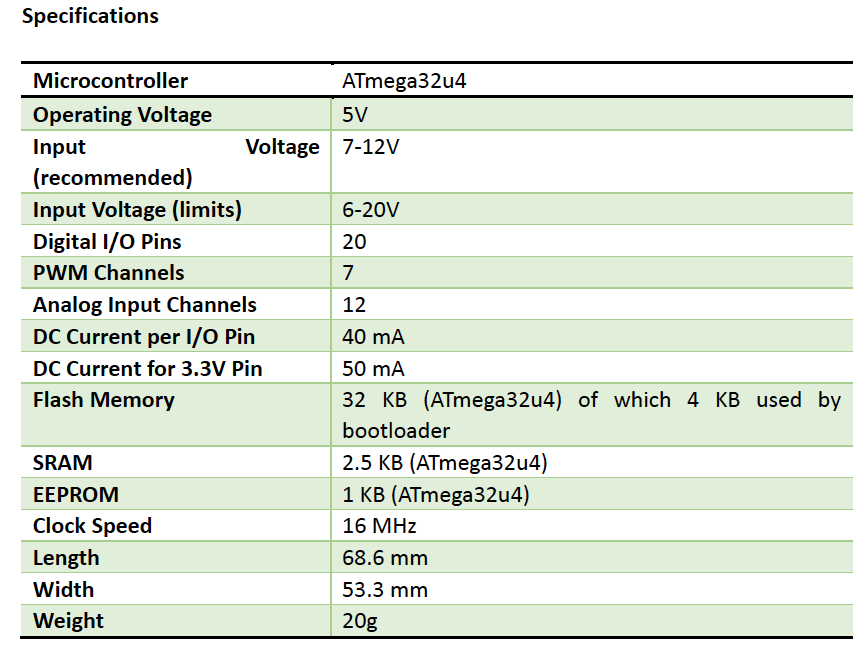
The Leonardo Development Board is a microcontroller board based on the ATmega32u4 .It has 20 digital input/output pins (of which 7 can be used as PWM outputs and 12 as analog inputs), a 16 MHz crystal oscillator, a micro USB connection, a power jack, an ICSP header, and a reset button. It contains everything needed to support the microcontroller; simply connect it to a computer with a USB cable or power it with a AC-to-DC adapter or battery to get started.
.png)
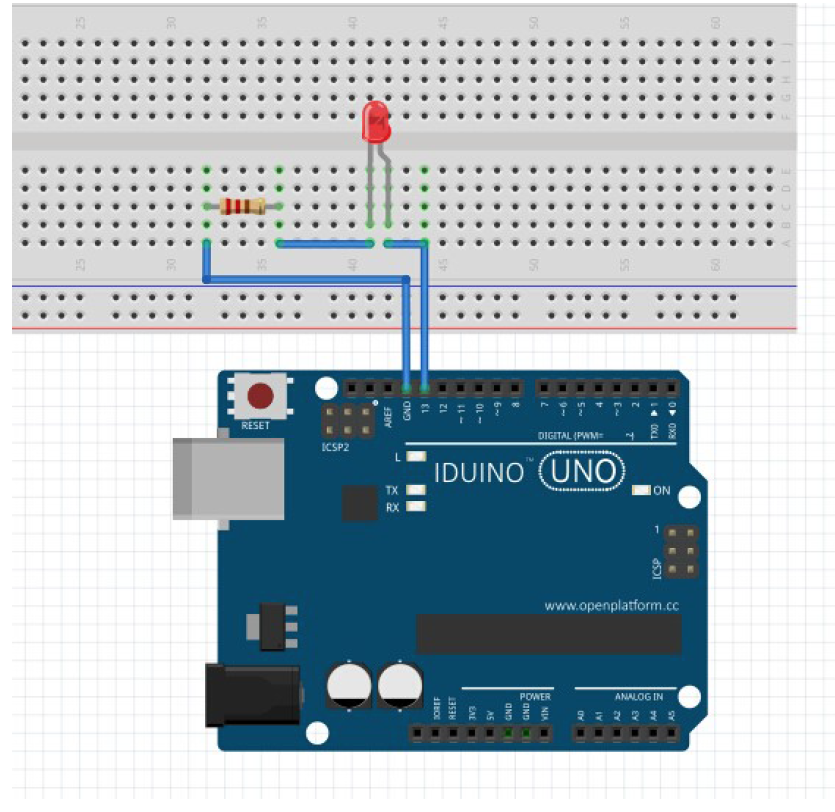
How to use these Development boards?
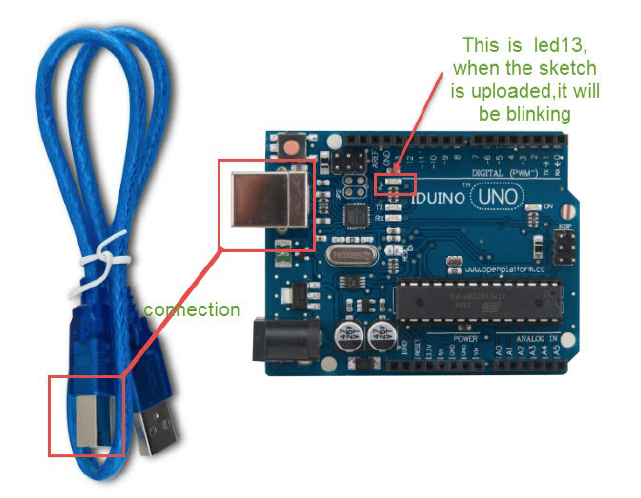
Here we have an example to indicate how to use these boards. In this trail, we flash an led via the IDUINO uno board’s 13 digital pin.
The connection as below:
Download the Arduino latest editionIntegrated development environment(IDE)from this page:
https://www.arduino.cc/en/Main/Software,
Then install the software, and connect the development board with the computer via USB cable as per below:
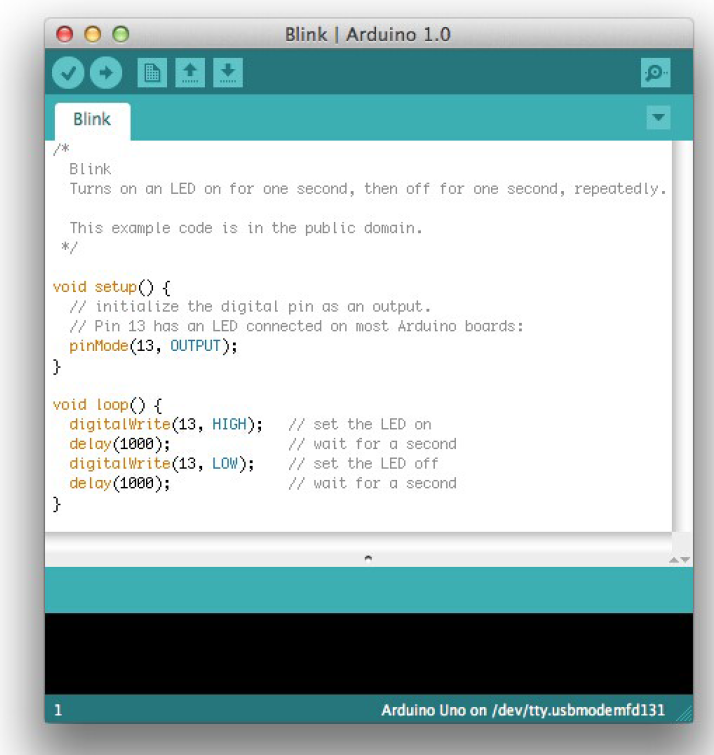
Launch the Arduino application, and open File > Examples > 01.Basics > Blink.
You'll need to select the entry in the Tools > Board menu that corresponds to your Develpment Board.
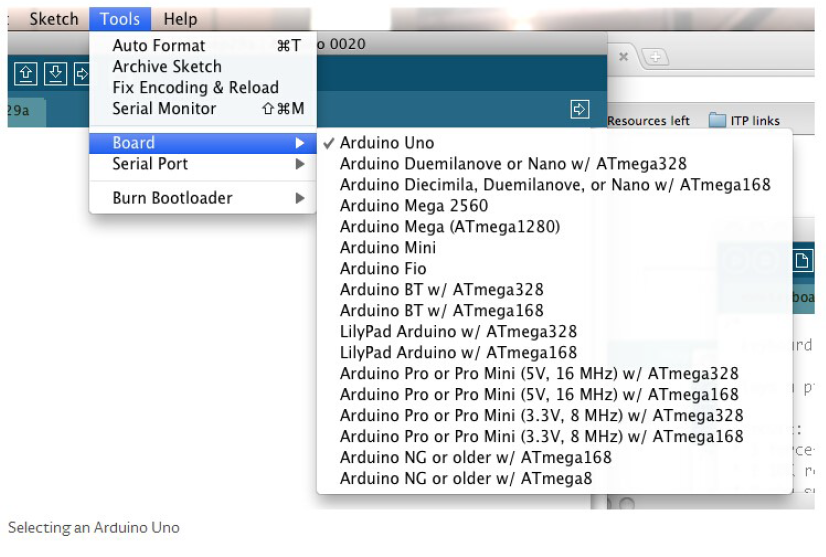
Select the serial device of the Development board from the Tools > Serial Port menu. On the Mac, this should be something with /dev/tty.usbmodem (for the Uno or Mega 2560) or /dev/tty.usbserial (for older boards) in it.
.png)
Now, simply click the "Upload" button in the environment. Wait a few seconds - you should see the RX and TX LEDs on the board flashing. If the upload is successful, the message "Done uploading." will appear in the status bar. (Note: If you have an Arduino Mini, NG, or other board, you'll need to physically press the reset button on the board immediately before clicking the upload button on the Arduino Software.)
A few seconds after the upload finishes, you should see the pin 13 (L) LED on the board start to blink (in orange). If it does, congratulations! You've gotten Arduino up-and-running.
